Travel feels lighter when your bag is smarter than your itinerary. Instead of wrestling with overflowing suitcases or digging through a chaos of clothes at security, you can build a carry-on that actually works for you: faster check-ins, smoother connections, and fewer “where did I put that?” moments. This guide focuses on practical, real-world packing tips that keep you ready to move—whether it’s a weekend hop or a multi-city adventure.
Build a Travel “Uniform” Instead of Outfits
Instead of planning individual outfits day by day, create a flexible “travel uniform” made of mix-and-match pieces. This doesn’t mean dressing boring; it means choosing a simple color palette and items that work in multiple combinations.
Start with a base of 2–3 neutral colors (black, navy, gray, beige, or white) and add one or two accent shades you love. Pack tops and bottoms that all work together, so any shirt can pair with any pants or skirt. Prioritize fabrics that don’t wrinkle easily, like blends with a bit of stretch, and items that can shift roles—a casual dress that works with sneakers in the day and with a scarf and flats at night.
A travel uniform also reduces decision fatigue. When you’re not spending energy every morning figuring out what to wear, you have more bandwidth for actually enjoying where you are. Bonus: simplifying your wardrobe makes laundry easier on longer trips, since most items can be washed together without color chaos.
Treat Your Personal Item as a “Mobile Command Center”
Instead of viewing your personal item (backpack, tote, or small duffel) as spillover space, treat it as your in-motion hub. Everything you might need within 60 seconds—on the plane, at security, at border control—belongs here, not buried in a suitcase in the overhead bin.
Use small pouches or zip bags to group essentials: one for tech (chargers, earbuds, power bank), one for health and comfort (meds, lip balm, hand sanitizer, wipes), and one for documents and valuables (passport, wallet, printed confirmations). Keep this bag under the seat in front of you if possible, so you’re not opening the overhead compartment every time you want something.
Think through your trip step by step: airport entry, security screening, waiting at the gate, boarding, in-flight, arrival, customs, ground transport. What do you need handy at each stage? Organize your personal item in that order—passport and boarding pass in an easy-access pocket, a pen for forms, a light layer for cool cabins, and a small, leak-proof bag for liquids so you can pull it out at security in seconds.
Pack a Mini “Fix-It” Kit for the Unexpected
A tiny repair and comfort kit can save a day’s plans. You don’t need a full toolbox—just a handful of small, multi-purpose items in a compact pouch. Include a few bandages, pain relievers, motion sickness tablets (if you’re prone to it), and your essential prescription meds in their original packaging. Add a couple of safety pins, a mini sewing kit, and a small roll or flat sheet of duct or gaffer tape wrapped around a card.
Toss in a stain-removal wipe or pen and a few extra zip-top bags; they’re lifesavers for wet items, snacks, or corralling small things. A collapsible, reusable water bottle is another smart addition—empty through security, then refill at a fountain to stay hydrated without constantly buying drinks.
The goal isn’t to carry every “just in case” item, but to cover the most common small problems that can make travel stressful: a sudden headache, a broken strap, a loose button, a coffee spill, or a leaky toiletry. When you can solve these in two minutes from your own bag, the whole trip feels calmer.
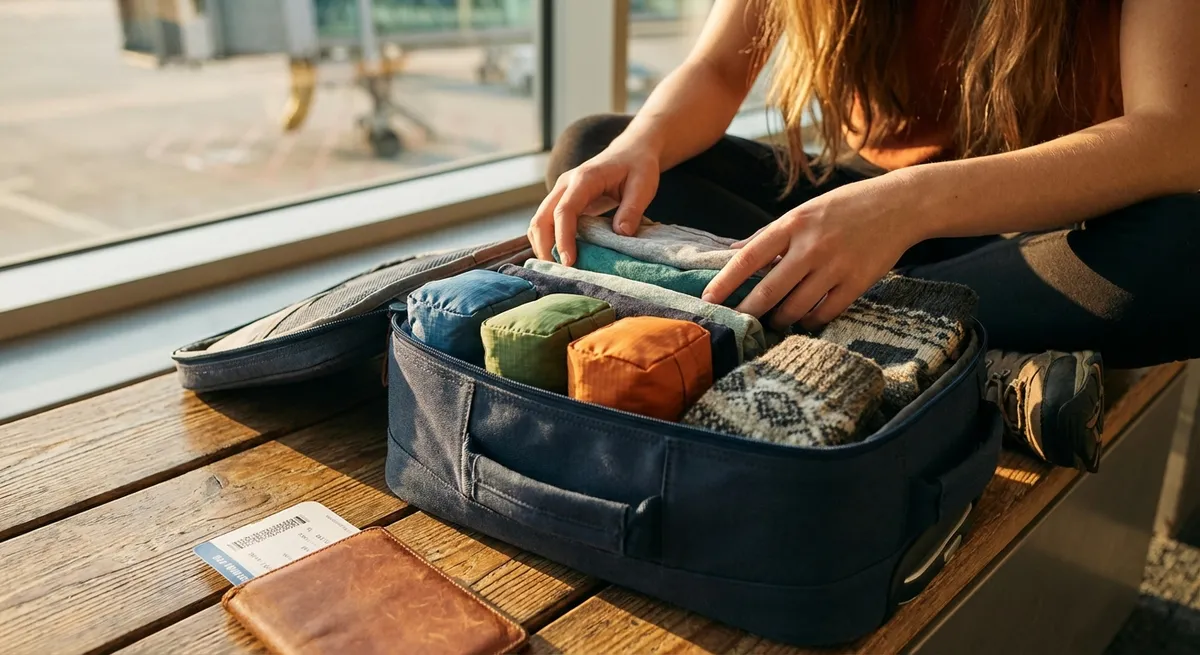
Use the “Layered Access” Approach Inside Your Luggage
Think of your suitcase in layers, not piles. The things you’ll use first or most often should live at the top or in outer pockets; long-trip or “backup” items can go deeper. This way, you’re not unpacking everything just to find one T-shirt.
Start by laying heavier items (like shoes) at the bottom near the wheels to stabilize your bag. Use packing cubes or compression bags to group clothing by type or purpose: one for tops, one for bottoms, one for workout or sleepwear. Place the cube you’ll reach for first (often the one with your first day’s outfit and sleepwear) facing the suitcase opening, so it’s on top when you unzip.
Create a “first night” mini-bundle: sleepwear, a change of underwear, toothbrush, travel-sized toiletries, and a small pack of wipes. Pack this bundle in an easy-to-grab spot. If your luggage is delayed and you have only your personal item, move this bundle there before boarding. If your luggage arrives with you, you still get the perk of not rummaging through everything when you’re tired from the journey.
Weigh, Test, and Time Your Bag Before You Go
A smart pack isn’t just about what you bring—it’s about knowing that your bag actually works in real life. Before your trip, do a quick “live test” at home. Fully pack your carry-on and personal item, then:
- Weigh your bag with a small luggage scale or by weighing yourself with and without it. Compare this with your airline’s carry-on limits (including regional or budget carriers on connecting flights).
- Practice lifting your bag overhead—if you struggle at home, you’ll struggle even more in a crowded aisle at the end of a long day.
- Walk around your home, up and down stairs or outside for a short loop. Notice any straps digging in, wheels misbehaving, or zippers that feel stiff.
- Time how long it takes you to find 5 items: passport, headphones, a charger, a sweater, and one toiletry. If it takes more than a minute, reorganize until it feels intuitive.
This dry run exposes issues before they’re airport-level stressful. Maybe you realize your bag is technically within size limits but awkwardly heavy, or your “easy-access” pocket isn’t that easy. Adjusting at home means you’re less likely to repack in a panic the night before—or end up checking a bag you planned to carry on.
Conclusion
Thoughtful packing isn’t about perfection or squeezing your entire life into a tiny bag—it’s about designing luggage that supports how you actually travel. A flexible wardrobe, a well-organized personal item, a tiny fix-it kit, layered access inside your suitcase, and a quick at-home test run all work together to keep your trip running smoothly. When your bags are ready to roll, you’re freer to focus on the fun stuff: new cities, new food, and the kind of memories that last longer than any souvenir.
Sources
- [U.S. Department of Transportation – Aviation Consumer Protection: Baggage Tips](https://www.transportation.gov/airconsumer/baggage) - Official guidance on airline baggage rules, loss, and delay considerations
- [Transportation Security Administration (TSA) – What Can I Bring?](https://www.tsa.gov/travel/security-screening/whatcanibring/all) - Up-to-date rules on items allowed in carry-on and checked luggage
- [Centers for Disease Control and Prevention (CDC) – Pack Smart](https://wwwnc.cdc.gov/travel/page/pack-smart) - Health-focused packing recommendations and medication guidance for travelers
- [Mayo Clinic – Travel Health Tips](https://www.mayoclinic.org/healthy-lifestyle/travel-health/in-depth/travel-health/art-20044743) - Medical and comfort considerations that influence what you should pack
- [IATA – Cabin Luggage Guidelines](https://www.iata.org/en/programs/ops-infra/baggage/cabin-luggage-guidelines/) - Industry-level overview of typical cabin baggage size and weight standards across airlines
Key Takeaway
The most important thing to remember from this article is that this information can change how you think about Packing Tips.